Tuesday, 12 June 2012

12th Chasseur a cheval, and terrain plans.

Completed a second base of Chasseur a cheval, this time from the 12th Regiment. Next up more British Dragoons. I also had another bash at some hills, still basically hex shaped but more rounded off...... I'm still not happy with them at all! I also made a couple of broken ground hexes, to break up the rather bare looking green mat, I thought I could treat these as sand quarries under CCN rules. I think basically I'm just experimenting at this stage as I plan my intended more detailed and landscaped boards (see below). I'm becoming more focused on what I hope to achieve.

So far.
Current totals are: 20 bases of infantry (31 figures), 7 bases of cavalry (18 figures) and 6 bases of artillery (2 guns and 8 crew) plus numerous command bases, it's really flying along now. What I continue to enjoy in this scale is how I can represent the many different types of troops so quickly, and in time massed cavalry formations will be possible, something that would be way beyond me in 28mm.


Planning ahead and a request.
I continue to think about and plan for my future terrain boards. By an amazing stroke of luck I recently came across an image of the first 6mm layout that really inspired me, way back in 1983/84. I have had this in my mind for a very long time, and I still think it represents for me what would be my ideal achievement in this scale. Seeing it again after all these years (30!) has proved a real motivation. It was made by Steve Dunn, and first appeared on the cover of one of the Wargame magazines, possibly 'Battle for Wargamers' or 'Wargames Illustrated'. If anyone can tell me which, or even better can scan the cover and article I'd love to read it again? Steve described it as representing the Normandy landscape. I love the way the fields were hedged and the irregular shapes. If done in sufficiently low relief my bases could be maneuvered across such a board and look quite realistic I think. Of course there remains the issue of hexes, but I'm working on it

Steve Dunn's original terrain from 1983/84 period.

This single picture represents my goal for this project, how I now make this work with my chosen rules of Command & Colors is going to be the challenge, it may well even take me back to the 'non hex/hex' approach discussed previously, further experiments using the DU stick now I have a firmer grasp of the rules would seem to indicate that it could be done. Stay tuned!


Saturday, 9 June 2012

Foot Guards and terrain.

Here are the 1st and 3rd battalions of the 1st Foot Guards. They have not yet received their new 'Belgic' shakos as you can see but still look quite resplendent. The distinctive colours were downloaded from 'Warflag' and a bit of extra shading added. I wanted a way to identify 'Elite' units and settled on the addition of a touch of gold paint on the rear of the bases as shown. These represent two quite powerful battalions under Command and Colours rules, both represent 5 blocks and add 1 extra dice in fire and melee combat. They may also ignore 2 'flag' rolls (which would usually force a unit to retreat 1 hex, or 3 in the case of poor quality 'militia). Very steady troops who can be relied on to 'stand' and fight well, just as it should be.

I have also remounted my buildings on new bases made of thin flexible plastic, same as I previously used for my road sections. It worked well I think?  I wanted to round them off rather than be obvious hexes, although they fit nicely into the hex as you can see. I'm very pleased with the result and have decided to adopt this approach for all my terrain now so hills will be rounded off. I had to abandon my attempt to salvage my old road section as river.... better I think to remake it from scratch.

My future commitment to the C&C rules means I have planned more bases for the future. I'm not happy with placing a base on top of those roofs when the village is occupied, so I'm going to make up some small figure bases, British and French that can be placed within the villages to represent an occupying base and replace a standard base, I think it will be worth the extra effort. I'm also going to paint up 4 'square' bases per side, featuring battalion bases at full strength in square with mounted commander in the centre. These will also be worth the duplication and effort I believe, and I think will look good on the table.

For the next week or two the plan is:

  • A base of French Chasseur a Cheval.
  • A base of British Dragoon Guards.
  • A base of Vistula Lancers.
  • 2 bases of Portuguese infantry.


I'm close to having the right troop numbers for the C&C Vimeiro scenario, so that's also a not too distant future plan.


Tuesday, 5 June 2012

A French victory - and some thoughts on the rules.

On French turn 8 the cuirassiers crashed into the leading British Light Dragoon unit and routed (eliminated) them. This earned them the 5th Victory Banner and a win for the French. I played on a bit longer, they made a 'breakthrough' move which carried them into the second LD unit and the chance for a 'bonus attack'. The second unit were forced to retreat (1 flag roll) and the cuirassiers again gained ground.

On the left flank a battalion of British light infanrty elected to form square when attacked by a regiment of Chasseur a cheval (I wanted to run through the square sequence this game). Infantry in square get to battle first against the active player and throw 1 dice (squares only ever throw a single dice). No hit scored so the Chassuers attack the square throwing 4 dice (edit* should be 1 dice only cav v square!) 1 flag is scored which usually forces a 1 hex retreat, but as squares do not retreat in CCN they instead lose 1 block.

All along the centre the British were under pressure now and with losses of 1 leader, 1 battery, 3 infantry battalions and a regiment of light dragoons I decide to call it a day on this first test game. Writing it all up step by step and captioning the photos etc has proved hard going so battle number 2 will be a more typical AAR with photos. It has been a useful exercise for me and I have made a couple of errors as expected. A throw of 'sabre' inflicts a hit in combat on any unit, not just leaders as I played it. Also an attached general reduced any retreat by 1 'flag' and not one hex, that is to say the unit can ignore 1 'flag' roll.

All in all it flew along and I have commited much to memory I think. The reference sheets pinned to the wall were VERY useful indeed, really well laid out and saved a lot of time looking up basic information such as how many dice to roll in any given situation. These can be downloaded from the links I gave a few posts back.

Its a bit odd at first when a base is simply 'eliminated' and removed from the table. I like to think more in terms of them having been totally routed beyond rallying, so I tend to use the term 'routed' which sounds more conventional. Units that are forced to retreat can of course be steadied by a general. There is no need to keep track of rout moves etc and this really speeds the game up. No record keeping is required at all and my little markers placed on the rear of the bases worked well and were discreet.

I need to work on 'combined arms' attacks more as I'm sure there is more scope for artillery in support of artillery attacks in there. The next game should be better.

In short, I LOVE C&C N, they are just so incredibly playable and real fun, but I still had the feeling of being in command, of having to think about where to move next, watching both flanks, trying to develop my artillery, place generals where they are most useful etc. I'm glad I made the decision to try these.

Final pics of the test game - I have not captioned these!

                          Battalion forms square (marker) in response to a cavalry charge.
                    Overview showing how the lines became broken as losses mounted.
                                          Situation at the end of the game.
                                                          British losses.
                The 'square tracker' with one card removed from hand and placed face down.
                       A Swiss battalion reduced to a measly 1 block, they fought well.


Monday, 4 June 2012

Action - moves 6 and 7.

Having confirmed that both British Light Dragoon regiments are indeed moved to contact before resolving melee unit by unit  (players choice) I can now complete British move 6. This was interesting as it featured both a cavalry 'breakthrough' move following combat and the 'Bonus attack' move as explained below.
Note: The images below have been wrongly move numbered in their captions! This is move 6 and 7 NOT 7 & 8! the main post text is correct, the images are the correct images but the move numbers are wrong! I apologise for the error. This post only, all others are correct - I will correct them later.


British move 6 - 'Cavalry charge' charge has been played and both Light Dragoon units have charged a regiment of Cuirassiers. The British heavy dragoon regiment remains in reserve in the centre on the British baseline.

1st melee - selected LD unit throws 3 dice (3blocks for British cavalry). scores 1 'hit' and 2 'flags'. Cuirassiers can ignore 1flag (retreat), but choose to retreat 2 hexes with 1 block lost. The triumphant LD's get a 'Breakthrough' move bonus of 1 hex and may then make a 'bonus attack' if they choose. (This only applies to cavalry). They use this bonus (1hex and may battle) to attack the raw conscript battalion who fail to form square (OK, so I totally forgot! Infantry attacked by cavalry have the choice of forming square of course Doh!... but lets assume nerves got the better of them on this occasion!). The dragoons throw 3 dice and score 1'flag' 1'sabre' and a miss. 'Militia' ( as the rules rate them) always retreat 3 hexes on a 'flag' roll, but they have an attached commander who can reduce this by 1 hex). However, the 'sabre' roll means that an attached leader must roll to see if he becomes a casualty, 2 dice and he escapes injury luckily. The battered battalion beat a hasty retreat and the commander elects to use the full 3 hex move to the rear and to comparative safety.

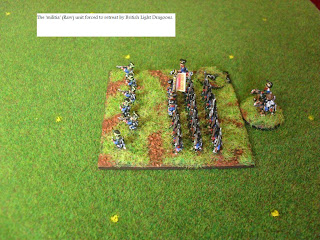

The French right is being driven back, although the cuirassiers are still in good shape.


Replace card and re draw.

French move 7. - 'Attack centre' card is played. order 3 units in centre. French commander makes an aggressive attack along the front, 1 line battalion advances onto a hex occupied by a detached British commander. Another battalion attacks a British battalion to its front and finally the elite battalion of converged Grenadiers is ordered up from its reserve position and begins its advance.


There are 2 melees to fight: French column v British line, the British battalion has already lost 2 blocks, and this time suffers a further 2 hits. It is immediately sent streaming to the rear in rout (eliminated), and the French battalion take 1 Victory Banner.

Second combat is the other attacking column who contact the poor detached British commander in the centre. 4 dice produces 2 'sabres' so the commander is killed and removed from the field. Another Victory Banner is awarded. (eliminating units or leaders = 1 VB). The French now have 4 VB's, just one short of the target for a victory. (This varies game to game/scenario to scenario)

This has been a good move for the French. Replace card and redraw.


British move 7. - Calls for desperate action as the centre is under pressure. A quick look through the 5 possible command cards and the ' 'Bayonet charge' card is played. order 4 infantry units.

The 95th Rifles who have been lining the edge of woods emerge and attack a weakened French battalion in front. A Highland battalion engages another French battalion and on the right centre 2 British line battalions engage a single French battalion. So 3 melees to fight:


1. The rifles throw 3 dice for its 3 blocks and force the French to retreat 1hex. The rifles hold their ground.

2.The Highlanders throw 4 dice and also force their opponents to retreat 1 hex. They choose to 'take ground' which brings them into line with the rifles on their left and the 2 battalion to their right,  steadying the British front.

3. The attack by the first of the two battalions scores 1 hit. There is an unsuccessful 'battle back' before the second battalion inflicts further losses and forces a retreat. The French battalion has been reduced to a single block (marked '1'). The British centre has been saved from collapse.


Replace card and redraw - a very useful 'Give them the cold steel' card comes up!


French move 8 - The French are only 1 VB from victory and play the 'Cavalry charge' card. All 3 French cavalry units will go on the attack. To follow.


Sunday, 3 June 2012

Action - move 6 -melee.

As it seemed obvious there was going to be some melees in this round I decided to work through it today. I'll probably do a bit of painting tomorrow, but any moves I do fight will be added in a couple of days time or so. This is actually only the French 6th move as I wanted to check the rules out before I complete British move 6 (see below). I find writing up stage by stage is a good way for me to quickly learn and retain the rules.


French move 6. - 'Bayonet charge' card played - order 4 infantry units. The French commander in the centre orders 4 line battalions to attack.  2 attack one British battalion and another two attack a battery of foot artillery. On this action card all infantry may move 2hexes and still battle.

1. First french column attacks, and throws 5 dice ( 4 blocks +1 for French LI v inf). 3 hits are scored, no flags, so enemy battalion is reduced to 1 block. It can still 'battle back', throwing 1 dice and scoring 1 hit.
2.Second French column now battles the reduced battalion, 5 dice scores 2 hits. The battalion is effectively eliminated from the game and the French collect a first Victory Banner. The victorious French battalion 'takes ground' and advances onto the abandoned hex (players choice, attackers only and does not apply to artillery).


3. Now the bayonet attack on the battery is resolved.  The first column attacks, throwing 4 dice and scoring 2 hits (artillery reduced to 1 block but still very effective in 'battle back). The artillery battles back with 3 dice for the single block ( I'm assuming this represent close range cannister fire), and scores 1 hit and 1 flag, causing the French battalion to retreat 1 hex. However, the second French battalion now attacks, throwing 4 dice and scoring 1 hit, eliminating the battery and earning a second Victory Banner. The victorious battalion declines to take ground as it will be unsupported.

Card is returned to pack and new card drawn.

British move 6. The British centre is under pressure but still well supported with reserves. So seeing an opportunity on the left flank a 'Cavalry charge' card is played. 2 regiments of light dragoons are ordered to charge the single French heavy cavalry unit to their front. Both units are advanced as shown in the image to begin combat. However, I want to clarify one thing before I proceed.
Question - when 2 units attack a single unit as in this case (and the previous move) is it correct to move both attacking units to contact before choosing which to resolve melee with first or should I move 1 unit, resolve the melee, then move the second unit? I think I am correct in moving both to contact as movement precedes combat. Once I'm clear on this I'll fight the melee and conclude move 6. 

Action - moves 3 to 5.

Firstly a correction. The British infantry unit in move 2 below (4th image from top,previous post), should have lost a further 'block' as its retreat to rear was blocked by friendly units. I moved it to the right and back but this was wrong. I have corrected this and it has now been marked down to just 2 blocks remaining  and replaced in position. Thanks to 'Foy' for clarification.


On with the game. British to make their 3rd move.
'Probe centre' card played.  order 2 units. The centre commander moves 2 hexes and attaches to an infantry unit, Foot artillery in centre are ordered to advance 1 hex (cannot fire). Replace and draw new command card.

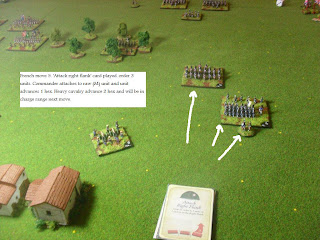
French move 4. 'Attack right flank' card is played. order 3 units. Artillery ordered to fire, infantry unit advanced 1 hex and heavy cavalry unit advances 2 hexes.

Fire combat: Artillery 'standing' ranged fire at range of 4 hex = throw 1 battle dice. No hit scored.

Replace and draw new command card.


British move 4. 'Probe right flank'  card played. order 2 units. The horse artillery are ordered to advance 1 hex and fire. (Foot artillery cannot move and fire). 1light infantry unit advances 1 hex.

Horse artillery, ranged combat - range = 3 hex and battery moved so just 1 dice. 1 hit scored on a French infantry target (marked down to 3 blocks).

Replace and draw new command card.


French move 5. 'Attack right flank' card played. order 3 units. Right flank commander attaches to poor quality infantry unit. and unit moves 1hex. Heavy cavalry unit advances a further 2 hexes and will be in charge distance next move.


British move 5. Plays the 'co-ordinated advance' card drawn last turn. Order 1 left flank unit, 1 right flank unit and 2 centre units. One unit of Light Dragoons on the left flank advances 2 hex. On the right flank a unit of light infantry advances 1 hex. In the centre the foot artillery are ordered to fire and a line unit advances 1 hex.

Artillery fire 1dice and again no hit scored.Range is 3 hexes.


French move 6 ..... to follow. There will be more exchanges of musketry and some close combat next move or so.


Saturday, 2 June 2012

Action! - Commands & Colours, Opening moves.

OK, I have a quiet few hours this afternoon so I'll get some play testing done. It will be slow going of course as I'm very much learning these rules at this stage and I want to write it up blow by blow for future reference. This means playing a move, reading rules, taking pics than coming back downstairs to download the images and write it up! I'm very quickly annotating the pics using 'paint' ( I'll have to update my image editing software I know!). Hopefully this should suffice though and by the end of the week I'll have a full battle written up. Next time I will take more care to prepare a proper scenario, but for now its as seen in the first pic. I'm mainly focusing on the rules at this stage as I hope you will understand.

5 command cards per side. 5 Victory banners for a win with a VB awarded for the capture of any village in the opponents half. Simples! French move first as below.

French left flank, first order - 'assault left flank' card played.
British first move - 'Forced march' card played in centre for a general infantry advance at double move rate.

French second move 'Bombard card played'.1 Hit on target and 2 'flag' rolls cause them to fall back.
British second move- 'Scout left flank' card played - Rifles advance into woods to front.

French 3rd move - ' Probe centre' card played - 2 infantry units may advance in centre.
Overview with British to complete move 3 - to follow!


Finally, a couple of gratuitous figure shots from the board! Lovely Baccus 6mm of course.