Sunday 30 August 2020

AB 18mm cavalry review & AB/Blue Moon comparison shots.

 Having taken the decision a few weeks ago to gradually double up all my Blue Moon cavalry with AB's here are a few more recently painted. While the horses do tend to measure up well against each other with the AB's being slightly more animated, the AB cavalry are a bit larger, and more detailed. I will be keeping all my Blue Moon cavalry as they can be used in larger future battles, but my DBN armies will eventually be all AB cavalry and a mix of BM and AB infantry as they match quite well aside from the longer bayonets of the AB's. I don't mean to knock the BM's and certainly the AB's are more expensive at 65p per foot figure and £1.35 per mounted, but for me this is the future direction as I just love painting them! I'm putting together a document to keep stock of my growing unpainted AB lead mountain.

Anyway, images show my AB cavalry so far, based of course for DBN. Note how the satin varnish really brings out the horse colours. These horses are painted using a combination of Flat Brown, Cavalry Brown and Japanese Orange, the very light highlights on some are the latter shade slightly knocked back with the brown and I really like the finish. I'm gradually learning that to paint greys in 18mm scale I need to knock back the white far more so it's London grey over the black followed by some ivory mixed into the grey for the highlights and used with a fairly dry brush. For the odd black horse I go with Black Grey over the base coat for highlights. All above of course are Vallejo colours.


Below are two close ups showing AB cavalry alongside BM cavalry. You can see the main difference is the size of the heads, the AB headgear being a bit larger, but not that noticeable on the tabletop, all are very nice figures.


Monday 24 August 2020

Another Commands & Colors clash on the board

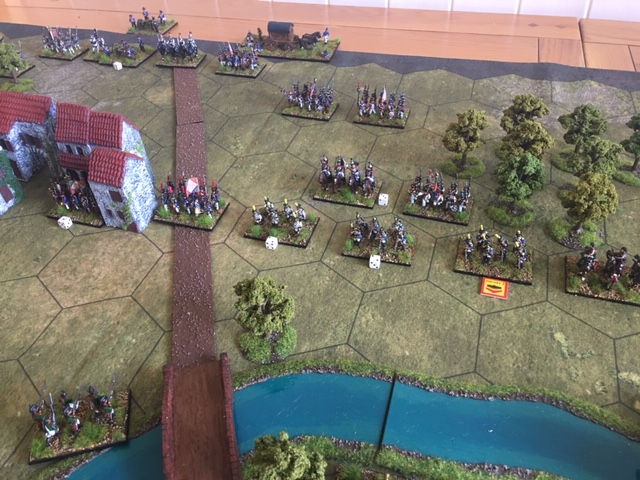
Quiet morning again today so feeling much better than the last week of flu I decided to set up a game of Commands & Colors on the game board using just the terrain tiles. One aim was to see how it would work if played as a remote game using my figures rather than blocks, thus the grid markers down the left side and across the bottom, which would be the view from an opponents side. It's been suggested that a wireless mini security camera would allow for a wide angle view to take in the entire board in decent resolution so I'm looking into that on Amazon, they are surprisingly in expensive. I used the newly made 10mm foamboard hill hexes which really help to identify the high ground when the figure bases are sat on them and blend very well with the bright green board.

Once again I elected to use the Ramekin order chit activation system rather than the cards as I like the freedom it gives in ordering units and co-ordinating attacks. As previously I modified it somewhat, a standard 3 chits per side and a dice roll before each bound for additional chits. I started the game throwing a D6 for 1 to 3 additional chits but after a couple of turns switched up to a good old fashioned average dice which would produce between 2 and 5 additional chits. This works for me as it increases the average number of activations per turn and really keeps the action moving at a pace. I also used the 'out of command' challenge when attempting to activate a unit more than 3 hexes from a commander, great rule but bit odd having to remember to challenge myself in solo play. Apart from this I played the game straight off the quick reference sheet supplied with the Spanish Expansion including standing ranged combat just to keep things simple. When infantry form square against cavalry I simply deducted 1 order chit per unit in square from the next and subsequent bounds until the square reformed. Really just playing around with Ramekin and trying to keep things as simple as possible for my old brain.

Placing the chits themselves beside the units has really helped me keep track of things as they can remain in place to indicate any further actions after movement, so ranged combat then melee combat, once all are removed it's bound over. 

A few observations from the game: 

The Spanish infantry are rubbish fighters! They fire at reduced effect, fight at reduced effect and run away twice as fast as the French or British. I tried to be aggressive with two units facing off to two French battalions but were quickly dispatched with losses. That said I like the uniforms which is why they get regular outings on the tabletop.

British Light infantry are pretty solid being 5 block strength and throwing 6 dice when stationary at full strength (less under Ramekin modifications). I tend to throw them forward supported by rifles and they always give a good account of themselves. That said I did lose 1 unit to heavy concentrated French volleys.

Cuirassier cavalry are hard to beat in a charge combat, Carabiniers saw off a unit of British Dragoons in a single round of melee throwing 5 dice for the 4 blocks including a couple of sabres against the 3 block British cavalry.

Horse artillery are vulnerable if pushed too far forward unsupported to attempt to reduce the range. A charge by French Lancers wiped them out.

Forming square against cavalry in C&C is so well handled, you form square and you get to roll to try to 'bounce' the cavalry first (the reverse of normal melee combat), just the single dice but it happened today, a flag symbol and they fell back. Otherwise the cavalry get to hack back, but again with just a single dice, I have always liked this rule although some have questioned the automatic right to form a square and introduced a 50/50 dice roll which I can understand. Funny bit is asking myself ' do you wish to form square?' but I try to play as if playing against an opponent!

The result was 5/2 to the French this time with several units reduced to a single block and so pulled back from the front line to avoid loss, C&C encourages keeping units well supported taking care to keep some open lines of retreat for units that need to fall back. All in all an enjoyable couple of hours passed and clear down was quick and easy. 

Random pictures follow, I only realised a few turns in that my lens was grubby resulting in some slightly fogged images.


Friday 21 August 2020

Some 40mm basing to do & more thoughts on digital sculpts.

As my wife and I are currently down with heavy cold/flu symptoms (non Covid) it's been a struggle to get anything done this week as we have both been knocked out. This morning, after my usual dog walk, I came back and sank onto the sofa where I'm sure I'll spend most of the day, annoyingly as I'm losing valuable hobby time. Between snoozes we have been binge watching BBC's Line of Duty together as we missed it first time round save the last series and really enjoying it, more twist and turns than an acrobat! 

 With Tony Barr's laser cutter back in working order he swiftly sent me my order for more bases, these included the bases for the Polish Lancers, the rocket troop and the two RHA guns. I have a backlog of basing to do on the 40mm figures painted since returning from Spain in late December. For the 40mm's I double up the 2mm MDF to 4mm, this allows for easy handling of these very weighty bases. What I now need to do is to match the shade of light earth that have used throughout the collection so Ill mix up enough to finish all of these bases. I use a filler/PVA/paint mix which I find keeps well for a couple of weeks if kept sealed in a tupperware container so need to do them all at once.

You can see that I decided on the final composition of the rocket base below with everything glued in position. The scratch built ladder was too wide for scale so I dismantled it and reduced the rung size and the support legs, I feel it now looks more in scale. I used the wheels and axle set from the Warlord metal bombardment set, plus the bucket and fuse box, discarding the frame itself as too obviously underscale. Essentially £15 for a set of wheels and a bucket! But the wheels make a big difference to the overall look and scale up pretty well. After a year or more in the planning I'm pleased with it. 

I continue to ponder the possibility of commissioning some 40mm Portuguese line infantry. I think that Ian (Smith) and I have learned some valuable lessons from our RHA project, and he has now produced a wonderful set of 40mm sailors for his 'Hornblower' project, digitally rendered, 3D resin mastered and put into moulds for metal castings. Ian's observations about the process of producing masters in resin for metal production are interesting, there is no doubt that some fine detail is lost in the process, and that the 3D renders require some details to be slightly exaggerated - buttons, fingers, fine lace, facial features, hair, swords - in order to produce a 3D resin master for metal production. That said the end result of the sailors is pretty damn good to my eyes and I am perfectly happy to use resin prints for my RHA gun crews. It's a learning process anyway.


The two officers below are the converted poses from the pointing officer file above. I do like this pose. Digital conversions means no chopping, filing or soldering, and at 20 Euros per file from the original 75 Euro 3D render represents good value for something unique.


Cacadores by Fightin' 40's were painted back in January (I think).


The Sash & Sabre Royal Marines are among my favourite 40mm units.


Thursday 13 August 2020

Too hot to paint this week .........

So instead of painting I have been playing around with building Mark1 of the rocket launch frame for the 40mm chaps. Scratch built and far from perfect but I'm getting there, one issue is that the ladder (which took a lot of fiddly work to make), is a little too wide for scale. That said I'm pleased with the crew and the rockets. When I had the conversions made from the original digital crew files I omitted to have the rocket carrying belts and holders fitted, but I doubt they would have been used for such large rockets anyway. I have ordered the Warlord Games 'Bombarding Frame' set, which while it might be under scale at 28mm is still quite an impressive piece and MIGHT just work with my 40mm's, we shall see when it arrives. What I can at least say is that my Rocket Troop are unique in this scale and something that has been well over a year in the planning. They will be based on my standard 120mm frontage x 100mm artillery base, pleased to say Tony Barr now his laser cutter fully operational again so they should not be long now.

In other news I have taken delivery of a copy of 'A Gentleman's War or Glossy Coats and Tin Bayonets' rules, described as 'A set of traditional rules for battles between traditional toy soldiers' and they certainly make for a very enjoyable read, a refreshing change from sets that take themselves far too seriously. Whilst primarily aimed at the Colonial period I have seen them used for Napoleonic games and wonder if I might do something with my big soldiers looking ahead. 


Officer "Damn it, I said fire to enemy in front not at our own lads".


Monday 10 August 2020

Same game, played using C&C Ramekin.

Can't say I'm enjoying this hot weather, at least back in Spain we had full air conditioning and a pool to cool down in, but no regrets whatsoever coming back home. My wife is in demand to stay over with our daughters, she has to take it in turns between the three of them and I don't mind as I get the house to myself and the chance to get a game on the table.

This afternoon  decided to set up the same game as previously, this time on the C&C mat. As you can see it's about as close as I could get on the hex grid but the armies are the same as before. Having given it some thought I decided to play using the Ramekin activation chit system, slightly simplified to three chits each side plus additional 1 to 3 chits diced for at start of each bound. It really  does free the game up playing without cards,and you always have at least 3 units to order each turn. I'm aware that certain bonus dice and special attack cards are missed out upon, but I'd say that sacrifice is more than made up for in the freedom to order the units that you want/need to each turn which really helps the action flow.

British rolled higher to move first and this time round I decided to push hard on the left with the light infantry, rifles, light dragoons and horse artillery allowing the Spanish on the right to sit back in a defensive position behind the river (I gave them an additional crossing point but they were not budging!). The rifles (95th & 60th) although only three 'blocks' each can fire up to 3 hexes, and I quickly pushed them forward to occupy the village with the light infantry (5 blocks each) on their left. The French came on in the same old style, and while the attack columns do not look so convincing on the hex grid the mass impact of line infantry with light infantry to the front still looked powerful. A regiment of cuirassiers took a bit of a peppering from the rifles in the village so I had to move them slightly to their left where they were out of range. A retreat flag was rolled against them and they were not at that point fully supported, but luckily cuirassiers (and carabiniers) can ignore 1 flag.

The French light infantry screen sat back out of range of the Spanish across the river waiting for the line troops behind them to come up, but as the British pressed on right flank that attack stalled as the French batteries were brought into action against the advancing British light infantry. One brave French battalion went in and assaulted the 60th rifles in the village and after two turns of combat finally routed them and took ground to occupy one half of the village, the other still occupied by the 95th. First blood (1 VP) to the French.

At this stage the Spanish commander is still scratching his head waiting for the opportunity to open fire when the advancing infantry move into range, at which point things could get quite bloody.

Ultimately aggressive French tactics won the day 6 to 2 VP's, much lead was wasted on the French guns to little effect and they continued to pummel the British Lights routing both units. At one point I switched target to a French infantry unit and rolled 3 artillery symbols which would have knocked out one of the guns in a single volley! The 95th rifles were finally dislodged from the village and destroyed by musketry as they attempted to fall back. To give the Spanish some credit they did some damage to the advancing French masses but with the loss of the Dragoons to charging French lancers it was game over.

I must say that I really enjoyed myself for a couple of hours, I'm so much more comfortable playing on a grid, and the game flowed along at pace. Against a live opponent and only having to play one side would clearly make the experience even more enjoyable and challenging, but meantime at least I get to push my soldiers a round a bit. I won't go into which I prefer of DBN or C&CN as I like both, but there is no doubt that where a hex defines the ground a unit occupies and movement and ranges are so apparent I am leaning back toward C&C once again. 


Final image shows the newly added AB line lancers doing a lap of honour post game. These are one piece castings presumable to allow for the casting of the various positions of the lances, really nice figures.