Some time back I laid out the Foz do Arouce scenario but did not get round to actually playing it out, so decided to have another go on the C&C board this time. It looks to be an extremely well thought out little scenario, with Ney commanding the French rearguard in typically aggressive style. The French can gain victory points by getting infantry units safely back across the Ceira river as well as routing enemy units, while the Anglo Portuguese are faced with the possibility of outflanking the French right and cutting off the retreat across the bridge which is the only point at which the river may be crossed. The 'Light Division' on the British left can move fast ( 2 hex's or 1hex and battle), although the French position is very strong, with hills and the village of Foz do Arouce being well defended. Overall a well balanced scenario with opportunities for both sides.
IN order to spice up solo play a bit my plan was to command the British following the roughly historical plan and to use Tony's excellent 'Dummy Blind Hand' trick to command the French in accordance with an overall plan of battle that Tony also obligingly supplied upon request.
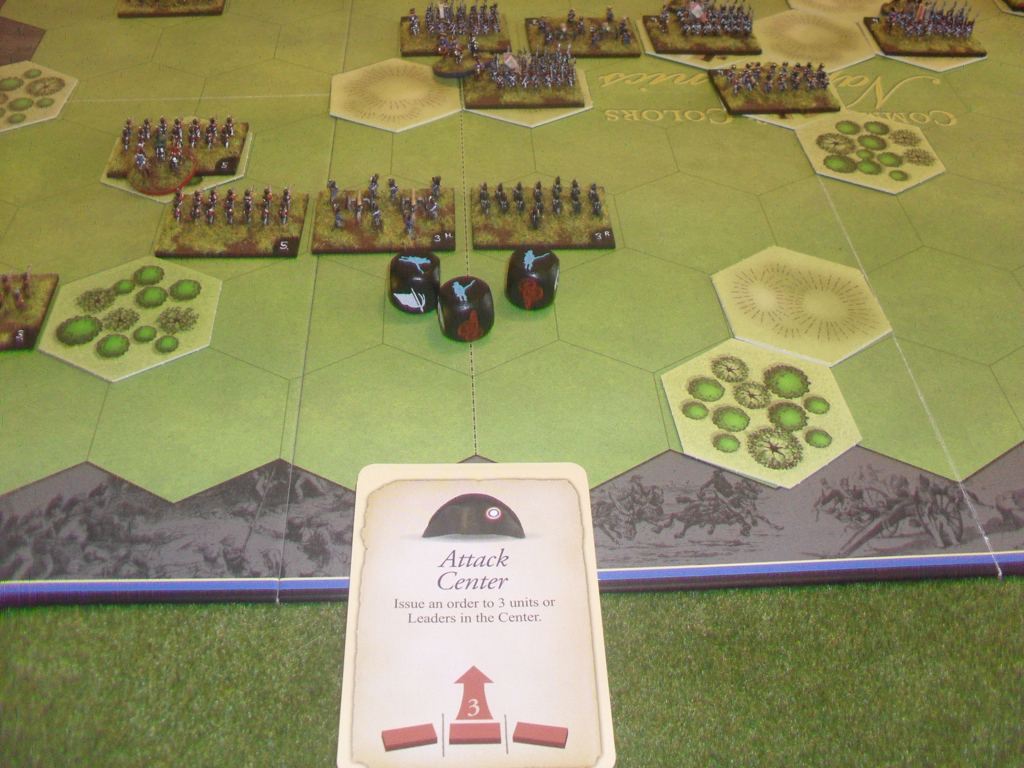
Here is the scenario map, you can see the bridge, the only exit point for the French, at bottom, occupied by French light cavalry at the start of the game.

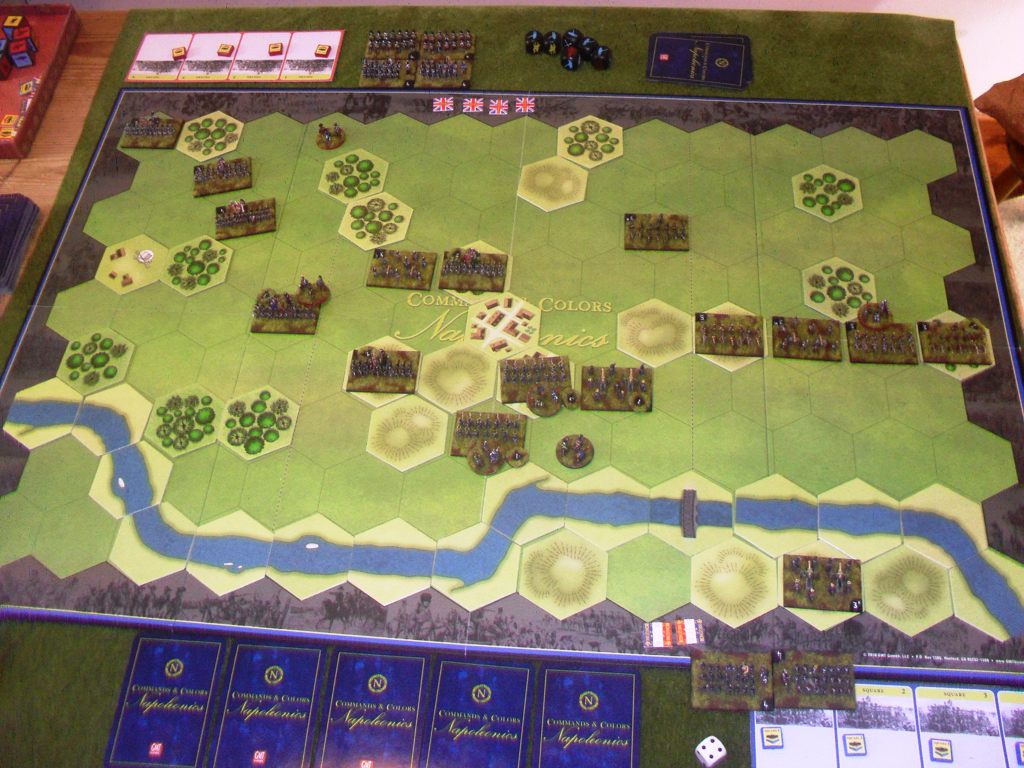
And here is the scenario laid out on the board.

The wargame.
The game begins with the British moving first and immediately playing a left flank card. The Light Division begins to advance and the French counter by quickly moving light cavalry out wide. The French plan was to get the Chasseur a Cheval out wide in order to threaten advancing infantry and if possible to pin them in square in order to slow them down. This in turn should enable Ney to order his central infantry to pull back towards the river crossing when the time is right. The RHA battery supported by the Rifles also advance and first blood falls to the accurate shooting of the rifles, who have a 3 hex range, causing 3 block hits on a French infantry battalion with attached leader Marchand, who survives a leader casualty roll. On the British right opening volleys also ring out, causing slight loss to another French battalion with Mermet attached, who also survives a casualty roll.
The 'Blind Hand' is playing very well and adds a new dimension to a solo game for sure. The French being frustratingly unable to get the other Chasseur unit across the bridge and out to scout on the flank.

The action continues mostly in the French centre and right flank. Both units of Chasseurs are now operating out on the right and one unit charges the most advanced British light battalion, which elects to form square on a 'wood' hex which they can. The combat is inconclusive and the second unit of light cavalry also attack the square. The square stands firm, forcing one cavalry unit to 'bounce off' while supporting fire from the RHA battery causes damage to the other. Ney orders back his two depleted infantry units towards the bridge, covered by fresh battalions. The French battery is left somewhat exposed upon the hill though and takes casualties from British rifle fire again.


The French need to move the exposed battery across in support of the Chasseurs to concentrate some fire upon the square, but the cards are not allowing this so far. Instead the French elect to use the 'left flank' card drawn (best of the 2!) to move the isolated light infantry battalion adjacent to Mermets battalion in the hope of covering it's withdrawal across the bridge in due course. So far no VB's have been awarded as it's mostly been about getting into position and replacing weakened units, but things look about to hot up.
Picton, commanding the British and Portuguese units on the right flank now decides its time to move against the French centre, and under a 'La Grande Manoeuvre' card he's been holding orders 4 units to attack, foot artillery being raced up in support as troops enter the woods adjacent to Foz do Arouce in order to contest the village. The French must now begin to inflict some casualties in order to gain a couple of VB's before they begin to fall back over the river to safety.


With the French centre under pressure Ney extends his line to the right as fire from British musketry and artillery begins to take it's toll, forcing the cavalry to retreat from it's pinning position on the square and a battery of artillery to fall back to the reverse ridge. Covered by this new French line a battered battalion unfit for further action and reduced to a single block crosses the river to safety and the first French VB.

The British now begin to take casualties as they press the centre and commence the assault on the village, but in the exchanges of fire a second French battalion is reduced to a single block and falls back towards the river crossing before it is totally routed which would give the British a VB. Things are quite tense now. The next French card selection under the Dummy Hand is a 'bayonet charge' card, and in typically aggressive style Ney orders a counter attack in the hope of inflicting maximum loss on vulnerable units. The British infantry are driven back from the woods in front of Foz do Arouce but unfortunately the single block battalion is lost in the combat. Score now is 1/1 but many units are reduced to 1 or 2 blocks.
The French follow up by sending forward the strongest Chasseur unit against some Portuguese lights moving up on the extreme flank, forcing them into square. Long range fire from a French battery across the river scores a lucky hit and the cavalry v square combat (just 1 dice each) results in the square being reduced to a single block. Portuguese troops held back in reserve on the British right begin to march towards the French centre.


Battle rages and the VB's start to mount up, both French cavalry units are eliminated and after some hard fighting just 3 French units remain intact on the 'worn' side of the river, the Light Division pushes slowly forward, volleys from the 5 block lights having devastating effect upon the depleted French. It's now 4/2 to the British and the French have clearly had it now.
The game ends on a British 'Forward' card, with an order to 6 units to engage the enemy, ranged fire from the first 3 decide the day, scoring the 6th and final VB. The French have been pretty much decimated, only 2 battalions making it back across the Ceira to safety. Ney surviving 2 leader casualty checks.
Post battle thoughts.
Initially I felt a little flat, as though I had not done the scenario justice but I quickly cheered up. It was frustrating at times, and I struggled to have much control over the French, being driven by the limited card hand, or what I could see of it. But then that unpredictability is of course realistic in battle. C&C rewards patience and the building of strong card hands for the right moment, but my card hands were all over the place! There was a couple of really timely cards drawn that did have a big impact at different stages and I love this aspect of the game. 'Le Grande Maneuvre' is a cracker if it turns up at a critical moment, it really gives the player a strategic boost if used well. Another is 'Fire and Hold' especially when used by British Light's and line units. Both came into play during the game. It finished a bit suddenly, with I think 4 French VB's going in the last couple of turns, but overall now I think it went OK. I will be sticking with the 'Blind Dummy Hand' method for solo play as it does indeed work well in practice.
Thanks to Tony for his thoughts upon Ney's position and suggestions for a battle plan for the French which also helped to make the solo play more realistic for me at least. It was a good plan but I muffed it, or at least the cards refused to allow me to do much more than I did for the French. I knew I had to inflict at least a couple of VB's upon the British before pulling back across the river screened by cavalry ..... it went badly wrong, such is the nature of War and a dodgy General (that's me!), great stuff.
Some of the 'playing pieces' .... " Them's Port'guese Sah!" Who's been watching Sharpe again then :-)


Historical Background.
The Combat at Foz do Arouce on March 15th, 1811, was the forth rearguard action fought during Massena’s retreat from Portugal. Once again, Marshal Ney commanded the rear guard. Disobeying Massena’s orders to cross the Ceira River and destroy the bridge near Foz do Arouce, Ney deployed around the town with Marchand’s Division, half of Mermet’s Division, and Lamotte’s light cavalry. It was a good yet dangerous position with the Ceira River at flood stage and the narrow bridge across it already somewhat damaged.
As at Redinha three days earlier, the 3rd Division attacked the French left while the Light Division attacked the French right. The Light Division caught the French unprepared and was making good progress towards the town as was the 3rd late in the day. Only an infantry charge ordered by Ney allowed the French to cross over to the far side of the river. By nightfall the withdrawal was complete.
Foz de Arouce was similar to the Combat of the River Coa fought on July 24th 1810. On that occasion, it was Ney who pursued the Light Division over the Coa. Now the Light Division played a key role in forcing Ney over the Ceira River.
Ney’s acrimonious relationship with Massena would continue to deteriorate. Within a month, he would be dismissed for insubordination.
The stage is set. The battle lines are drawn and you are in command. Can you change history?
Battle Notes
British Army
Commander: Wellington
5 Command Cards
Move First


Commander: Wellington
5 Command Cards
Move First
 |  |  |  |  |  |  |  | |
| 4 | 2 | 1 | 1 | 1 | 3 | 2 | 1 |
French Army
Commander: Ney
5 Command Cards
Commander: Ney
5 Command Cards
 |  |  |  |  |
| 4 | 2 | 2 | 2 | 3 |
Victory
6 Banners
6 Banners
Special Rules
Any ordered French infantry or artillery unit (regardless of strength and with the exception noted below) that exits the battlefield from the French exit hex will count as a Victory Banner for the French army. Exited leaders and cavalry units do not count for French Victory Banners.
Any ordered French infantry or artillery unit (regardless of strength and with the exception noted below) that exits the battlefield from the French exit hex will count as a Victory Banner for the French army. Exited leaders and cavalry units do not count for French Victory Banners.
The French foot artillery unit on the far side of the Ceira River must remain on that side. If ordered off the battlefield, it does not earn a Victory Banner for the French.
French units cannot exit from the French exit hex when forced to retreat due to ranged or melee combat. Units must halt or remain on the exit hex and lose one block for each retreat hex that cannot be taken. If the unit is eliminated, the British player receives one Victory Banner.
The bridge over the Ceira River is a Victory Banner objective hex for the British player. If a British unit occupies the bridge at the start of the British player’s turn, the British army gains a Victory Banner. As long as the unit remains on the bridge hex it will count as a British Victory Banner (the French line of retreat has been blocked). If it moves off or is eliminated, it no longer counts.
The Ceira River is impassable except at the bridge.
No comments:
Post a Comment
Thank you for leaving a comment, it will be published as soon as I have read it in order to avoid spam.